最近 Coinbase 推出了一个 AI Pay 的协议,可以支持使用稳定币比如 USDT 以及 USDC 进行快速支付,并可以结合 AI 的能力。推出之后热度还是比较高的,在这里学习一下这个协议,但是不包含 AI 的内容。

GitHub - coinbase/x402: A payments protocol for the internet. Built on HTTP.

x402 是什么

借用他们官网的描述,这是一种互联网原生支付的开放协议(An open protocol for internet-native payments)。

作为一个协议,在官网上总结了它有以下的几个特点:

  1. No Fees。作为协议,它不收取任何的费用,所有人都可以免费使用。
  2. Blockchain Agnostic。作为 Coinbase 推出的协议,它并没有和某一条链或者代币绑定,所有链和代币都可以支持。
  3. Instant settlement。即时结算,支付的结算时间和链的确认时间相关,像 Base 链的话基本上是立刻就可以确认。
  4. Frictionless。无摩擦,这个我理解是针对开发者来说,集成起来会非常方便。
  5. Web native。Web 原生,这里指的是它使用的 402 HTTP 状态码。
  6. Security & trust via an open standard。指的是去中心化下的开放和安全。

总结一下,x402 围绕 HTTP 402 状态代码构建, 使用户能够通过 API 支付资源费用 ,而无需注册、电子邮件、OAuth 或复杂的签名。另外,它还支持更低精度的支付,最低 0.001 USD。

x402 背景技术

在了解 x402 协议之前,还需要先了解一下它使用到的一些技术。

402 状态码

HTTP 协议的状态码大家都不陌生,我们在发起一个 HTTP 请求的时候,请求会携带一个状态码,比如常见的 200 状态码表示请求成功,404 状态码表示服务器找不到资源等等。

402 状态码表示这个资源是需要用户付费之后才可以访问。

ERC-3009

ERC-3009: Transfer With Authorization

ERC-3009 Transfer With Authorization 是 x402 的一个关键技术,它允许用户通过链下签名的方式,进行代币的转移。

以往我们进行 ERC20 代币的转移的话,是需要 Approve 给到其他用户,这部分是需要用户支付 Gas 费用。ERC-3009 允许用户在链下对代币转移进行签名,之后通过一个 Relayer 服务来将这笔转移上链。

由于是链下签名的方式,所以用户不需要支付这部分的上链费用,上链费用由 Relayer 来承担,但是 Relayer 一般需要用户支付一定的手续费。

总结一下就是用户对转移的一些数据,比如转给谁、转什么代币、数量多少等数据进行签名,后续由 Relayer 进行发送上链。一个参考的合约方法如下:

1
2
3
4
5
6
7
8
9
10
11
12
13
14
15
16
17
18
19
20
21
22
23
24
25
26
27
28
29
30
31
32
33
34
35
36
37
38
39
40
41
42
43
44
45
46
47
48
49
50
51
52
53
54
55
56
57
58

// 用于存储已使用的授权
mapping(address => mapping(bytes32 => bool)) public authorizationUsed;

// 用于存储已取消的授权
mapping(address => mapping(bytes32 => bool)) public authorizationCanceled;
/**
* @notice 通过授权进行转账
* @param from 发起转账的地址
* @param to 接收转账的地址
* @param value 转账金额
* @param validAfter 授权生效时间戳
* @param validBefore 授权失效时间戳
* @param nonce 授权的唯一标识
* @param v 签名的v值
* @param r 签名的r值
* @param s 签名的s值
*/
function transferWithAuthorization(
address from,
address to,
uint256 value,
uint256 validAfter,
uint256 validBefore,
bytes32 nonce,
uint8 v,
bytes32 r,
bytes32 s
) external {
// 验证授权是否有效
require(!authorizationUsed[from][nonce], "Authorization already used");
require(!authorizationCanceled[from][nonce], "Authorization canceled");
require(block.timestamp >= validAfter, "Authorization not yet valid");
require(block.timestamp <= validBefore, "Authorization expired");

// 验证签名
bytes32 digest = _hashTypedDataV4(
keccak256(abi.encode(
keccak256("TransferWithAuthorization(address from,address to,uint256 value,uint256 validAfter,uint256 validBefore,bytes32 nonce)"),
from,
to,
value,
validAfter,
validBefore,
nonce
))
);
require(ECDSA.recover(digest, v, r, s) == from, "Invalid signature");

// 执行转账(此处应调用实际的ERC20转账逻辑,但为简化省略)
// 例如:IERC20(token).transferFrom(from, to, value);

// 标记授权已使用
authorizationUsed[from][nonce] = true;

// 触发事件
emit AuthorizationUsed(from, to, value, validAfter, validBefore, nonce);
}

x402 协议过程

用官方代码仓库的一张图来进行讲解。

首先,和传统的支付 Client 到 Server 两个角色不同,x402 有 4 个角色,新增了 Faciltator 和 Blockchain。

首先,Client 发送一个 HTTP 请求,请求某个资源,可以是一个推文、一个图片(1)。Server 在接收请求之后,返回 402 错误码,告诉 Client 这个资源需要支付,并返回付款要求的信息(2)。

Client 收到 402 之后,会让用户去选择支付方式,并按照(2)中需要的支付信息组装 payload(3)。之后将这个 payload 放在X-PAYMENTHeader 里面,发送给到 Server(4)。

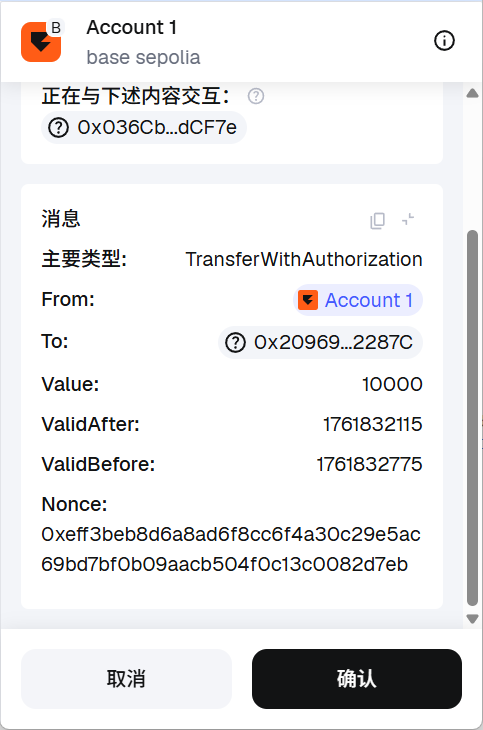
Server 在收到带有X-PAYMENT头信息的请求之后,会去校验这个 Payload 是否是有效的(5),校验的角色就是 Faciltator。Faciltator 可以自己写,也可以用已有的服务。Faciltator 校验之后返回给 Server 校验结果(6)。

如果校验失败,那么 Server 就会再次返回 402 状态码,让 Client 重新组装 Payload。如果校验成功,则继续(7)。

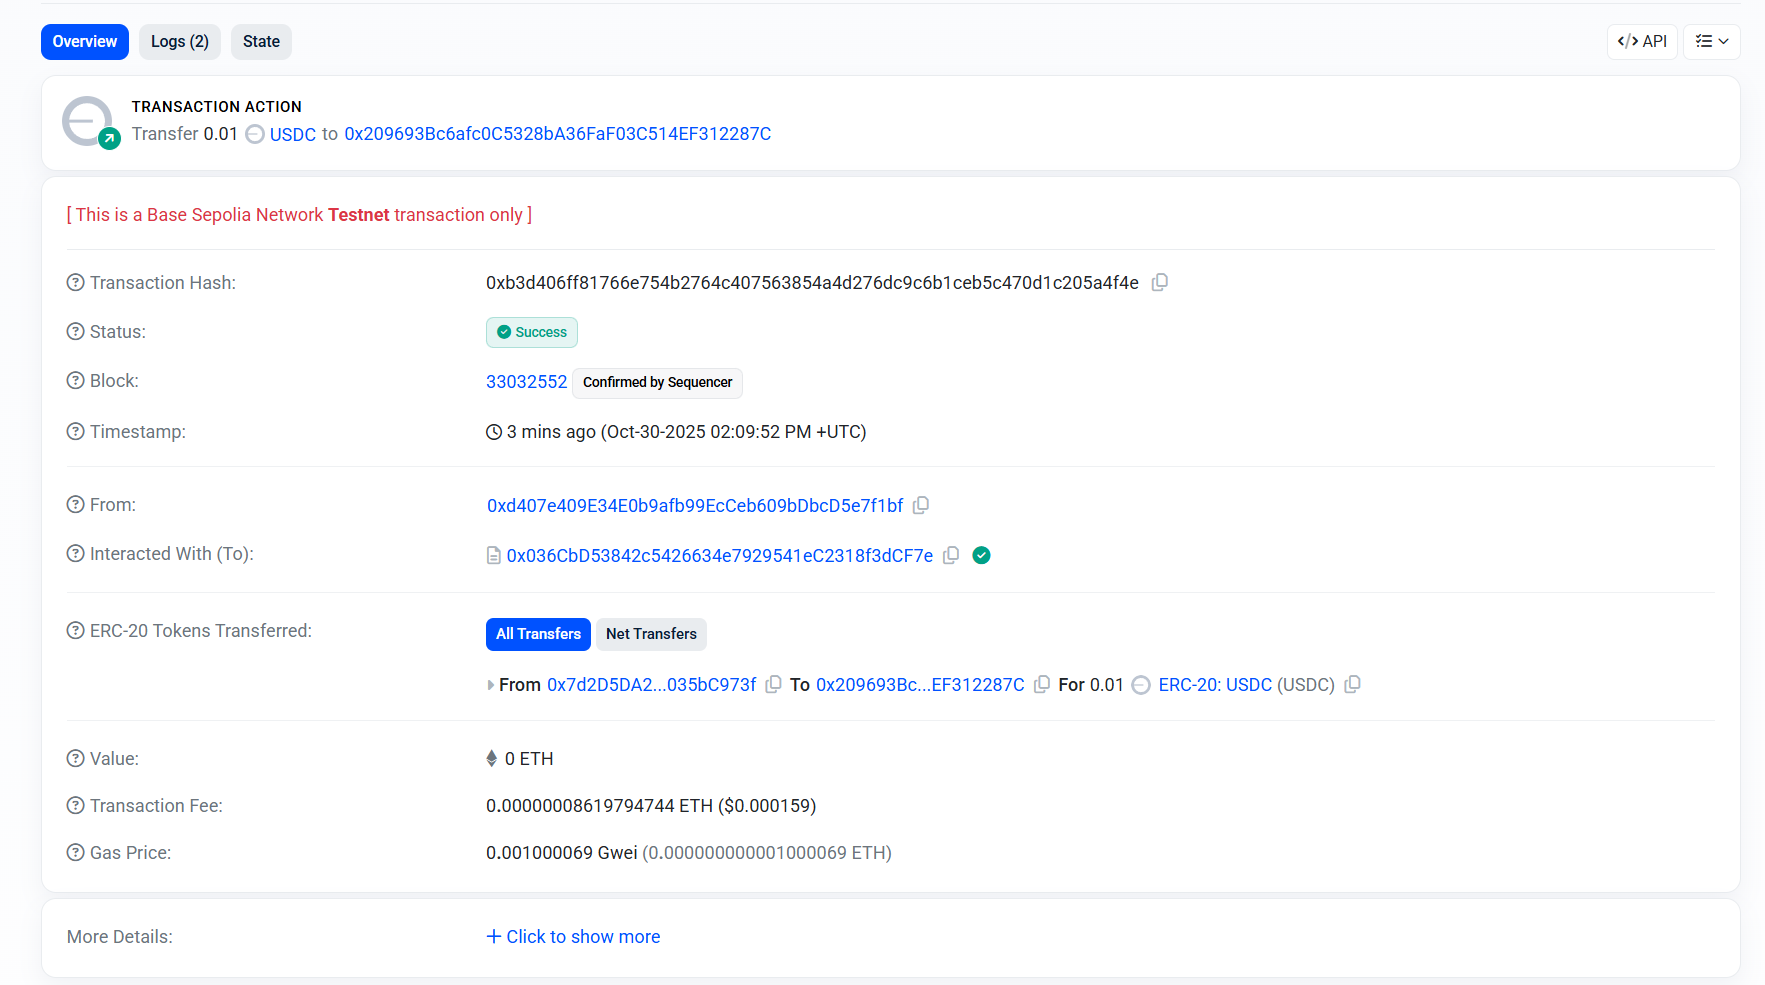
之后 Server 将结算请求发送给 Faciltator(8),由 Faciltator 进行结算并发送到链上(9)。Faciltator 在交易确认之后(10),将结算的结果返回给 Server(11)。

Server 将请求的资源结果放在正文中返回给用户,并且在X-PAYMENT-RESPONSE头里面带上 Base64 编码后的结算结果。

付款要求结构约定

在第(2)步的时候,Server 会返回一个付款要求的结构,现在规定这个付款要求需要包含以下内容:

1
2
3
4
5
6
7
8
9
10
{
// Version of the x402 payment protocol
x402Version: int,

// List of payment requirements that the resource server accepts. A resource server may accept on multiple chains, or in multiple currencies.
accepts: [paymentRequirements]

// Message from the resource server to the client to communicate errors in processing payment
error: string
}

其中,paymentRequirements需要包含:

1
2
3
4
5
6
7
8
9
10
11
12
13
14
15
16
17
18
19
20
21
22
23
24
25
26
27
28
29
30
31
32
33
34
35
{
// Scheme of the payment protocol to use
scheme: string;

// Network of the blockchain to send payment on
network: string;

// Maximum amount required to pay for the resource in atomic units of the asset
maxAmountRequired: uint256 as string;

// URL of resource to pay for
resource: string;

// Description of the resource
description: string;

// MIME type of the resource response
mimeType: string;

// Output schema of the resource response
outputSchema?: object | null;

// Address to pay value to
payTo: string;

// Maximum time in seconds for the resource server to respond
maxTimeoutSeconds: number;

// Address of the EIP-3009 compliant ERC20 contract
asset: string;

// Extra information about the payment details specific to the scheme
// For `exact` scheme on a EVM network, expects extra to contain the records `name` and `version` pertaining to asset
extra: object | null;
}

这里主要解释一下 scheme。scheme 主要是为了约定支付的形式,比如upto或者exact,前者规定最多可以转多少代币,后者规定这次精准转移多少代币,当然,这些都可以根据 Server 和 Faciltator 自行来新增,只需要在验证的时候可以满足规则就可以。

实际来支付一笔!

在 Github clone 项目之后我们可以在本地跑一个 testnet 的模拟环境,实际发一笔交易看看。

在官方给的 demo 中,前端的页面代码如下:

1
2
3
4
5
6
7
8
9
10
11
12
13
14
15
16
17
18
19
20
21
22
23
export default function Paywall() {
const paymentRequirements: PaymentRequirements = {
scheme: "exact",
network: "base-sepolia",
maxAmountRequired: "10000",
resource: "https://example.com",
description: "Payment for a service",
mimeType: "text/html",
payTo: "0x209693Bc6afc0C5328bA36FaF03C514EF312287C",
maxTimeoutSeconds: 60,
asset: "0x036CbD53842c5426634e7929541eC2318f3dCF7e",
outputSchema: undefined,
extra: {
name: "USDC",
version: "2",
},
};
return (
<div>
<PaymentForm paymentRequirements={paymentRequirements} />
</div>
);
}

在这里主要是前端根据PaymentRequirements和协议构建对应的签名内容。从这部分签名内容我们可以得到:

  1. 支付的方式是exact,即支付定额代币;
  2. 网络是在base-sepolia。网络也是需要指定的,避免在不同网络中重复广播交易。
  3. 需要支付100000x036CbD53842c5426634e7929541eC2318f3dCF7e,也就是 USDC,给到地址0x209693Bc6afc0C5328bA36FaF03C514EF312287C

之后,我们点击 Pay 按钮,前端此时的逻辑如下:

1
2
3
4
5
6
7
8
9
10
11
12
13
14
15
16
17
18
19
20
21
22
23
24
25
26
27
28
29
30
31
32
33
34
35
36
37
38
39
40
41
42
43
44
45
46
47
48
// 处理 PaymentRequirements
const unSignedPaymentHeader = preparePaymentHeader(
address,
1,
paymentRequirements
);

// 构建 eip712 的签名数据
const eip712Data = {
types: {
TransferWithAuthorization: [
{ name: "from", type: "address" },
{ name: "to", type: "address" },
{ name: "value", type: "uint256" },
{ name: "validAfter", type: "uint256" },
{ name: "validBefore", type: "uint256" },
{ name: "nonce", type: "bytes32" },
],
},
domain: {
name: paymentRequirements.extra?.name,
version: paymentRequirements.extra?.version,
chainId: getNetworkId(paymentRequirements.network),
verifyingContract: paymentRequirements.asset as `0x${string}`,
},
primaryType: "TransferWithAuthorization" as const,
message: unSignedPaymentHeader.payload.authorization,
};

async function handlePayment() {
setIsProcessing(true);
const signature = await signTypedDataAsync(eip712Data);

const paymentPayload: PaymentPayload = {
...unSignedPaymentHeader,
payload: {
...unSignedPaymentHeader.payload,
signature,
},
};

const payment: string = exact.evm.encodePayment(paymentPayload);

const verifyPaymentWithPayment = verifyPayment.bind(null, payment);
const result = await verifyPaymentWithPayment();
console.log("result", result);
setIsProcessing(false);
}
首先,前端这边会根据 eip-721 去构建签名的内容,内容除了包含支付的信息之外,还会包括
  1. 一个随机的 Nonce 值,避免重放攻击。
  2. 支付的时间区间,只有在这个时间执行的支付才会是有效的。

之后用户在钱包签名这个内容,目前的交互都是还没有上链的,用户只是做了一次信息的签名。

签名完成之后,你就可以访问到这个付费资源了,是一首动感的音乐。

我们可以再去浏览器里查看支付的链上记录,可以看到我们是支付了 0.01 USDC 给到了对应的地址,并且由于我没有对应的原生 ETH 代币,这部分的 Gas 并不是我来支付的。

总结一下

本文没有对后端的代码进行解析,有兴趣的小伙伴可以去官方的代码仓库查看。

体验下来感觉支付过程还是比较丝滑的,并且允许用户不持有原生代币就可以进行支付,支付的门槛更低了。并且整个协议不是很复杂,后续在对已有项目进行改造的成本是可控的。

我觉得提供Faciltator服务是一个不错的方向,提供一站式的payment接入方式,结合一些节点服务推出,每次收点手续费来覆盖 Gas 以及作为盈利,应该是不错的。收集了一下最近两周的数据,供大家参考(数据来源:x402scan.com)。

按照 1 个点的手续费来看的话应该也还不错。这么看支付的最小金额设置为 0.001 可能也是为了收手续费,USDC 是精度 6 的,理论上最低可以收 0.1 个点的手续费。(纯瞎想)